In The Garage - January 2021

January 2021 Issue 11 - Editor: Andrew Willmott
Welcome to Issue 11 of In The Garage. We are always looking for content so please let us know what is going on in your garage.
In The Garage isn’t published at fixed intervals but rather when we have enough content to make a reasonable read. Contributions don’t need to be a novel about major project; simple hints and tips or a picture and a few words of explanation are welcome.
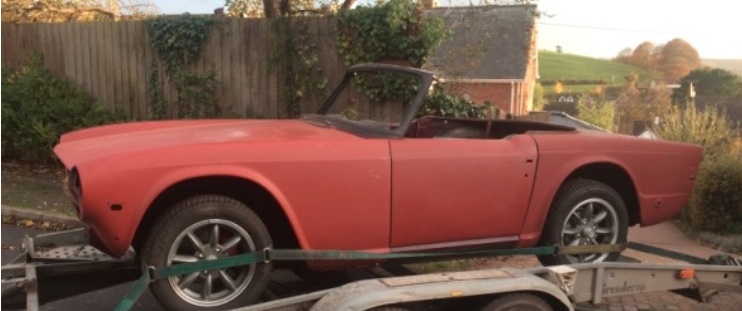
Adam Box –TR6
TRials and TRibulations with a TR6.
About 50 years ago I looked out of one of my classroom windows and watched enviously as the Economics teacher, Alan Skuse, rolled up in his Mimosa TR6. I was hooked and I wanted one.
About 20 years later a friend offered me his recently refurbished TR4 at what seemed like a good price and I entered the world of the bottomless money pit, aka TR ownership. On approaching my retirement two years ago I decided it was time to swap the 4 for the longed for 6, and so my adventure began.
Several viewings of optimistically priced rather tired examples (including a 360 mile round trip to see a car I had rejected before even getting out of mine) led me to believe that I was not going to find an example in the condition I wanted within or even close to my price range. I then hit on the entirely logical plan of buying a car in need of renovation and doing much of the work myself, thereby getting a nice car at an affordable price. Fool!
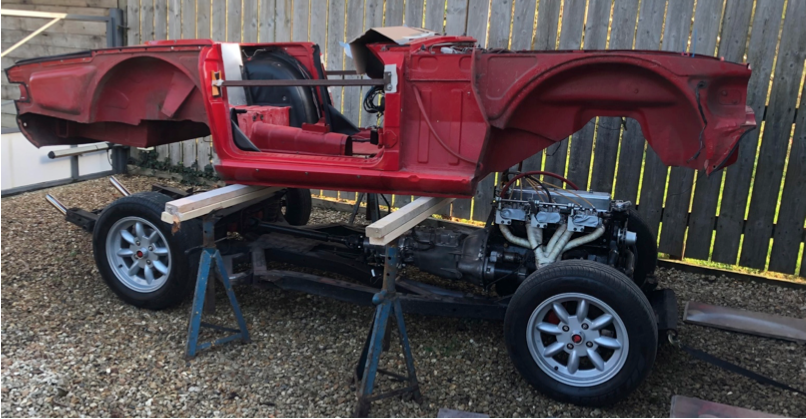
After searching various sales sites I found a sound looking beast on Ebay and after exchanging emails with the seller ventured a mere 60 miles to view it. As described, the car was in parts with the chassis completely restored and ‘rolling', the body panels were loosely attached having been stripped of all paint and there were 15 boxes with all the bits. I was assured that almost all the parts were there and that all I needed to do to complete this unfinished project was get it sprayed and then re-assemble.
As a child of the Meccano generation, what could possibly go wrong?
Well, just about everything could and did go wrong, which will come as no surprise to anyone who has followed this route to ownership. Firstly, the tub came off and revealed a chassis with some new repair sections and plenty of new paint. However, my mechanic friend pointed out that both differential supporting cross-members were heavily rusted and needed replacing, and so the unexpected costs began. In Feb 2019 he sent the tub away for sandblasting, a job he expected to take a few days. Unfortunately the guy doing the job went down with pneumonia (he is now fully recovered, thankfully) and so it didn’t come back until late July, and when inspected it resembled a sieve rather than a body tub. In addition to the myriad of rust holes it looked like as if an ape had tried to use a spot welder almost everywhere, with new sections of metal crudely tacked on over the old rusting bits.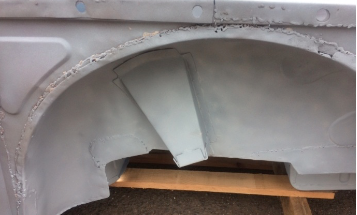
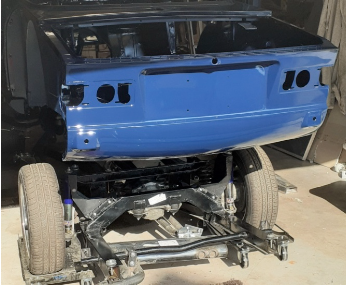
My mechanic estimated it would need £3000 for parts and the same for labour, and warned that even then it could be a second rate tub due to alignment issues. So, after an appeal through various Facebook groups I acquired a replacement tub in good condition and needing only to be modified to RHD, and there went another huge chunk of my retirement savings. This tub has now been under-sealed and sprayed in my choice of colour.
Sapphire Blue, (sorry Mr Skuse, but I wasn't sure that yellow was right for a 65 year old!), it is mounted on the now fully renovated rolling chassis and the rebuild is under way, exciting times.
Sadly though, the excitement has been diluted by the discovery two years after the purchase, that the phrase ‘almost all the parts are there’ was a tad optimistic if not totally dishonest. There have been a few expensive omissions like the PRV (£110) and the T piece it sits on, some fuel injectors, a distributor mount, the wooden dash glove box door and many bits of trim. In addition the endless list of small bits has totalled hundreds of pounds (how can a 1cm clevis pin cost £1.65?) and every day I find another batch of clips, 3/16ths bolts or ludicrously expensive rubber bits are needed. The variation in prices for some parts is huge and it is possible to save a lot by shopping around though some of the benefits are lost through postage costs, sadly. Oh, and I found the wiring loom had some major issues where wires had melted close to the fuse box, so bought a new one (more mega-bucks!) and recently the doors and bonnet have been found to be in need of far more remedial work than had been expected. Nightmare!
So, with a few hours work on most days, some large bills for labour on the bodywork and with no more nasty shocks (I was assured that the engine and diff had been rebuilt and that gearbox was sound, but then the same was said of the chassis!) I could have this car on the road for summer 2021. It will be good looking, sound underneath and in body and worth about £20k, and I will have the satisfaction of having built it myself. However, the knowledge that it has cost far more than £20k to get it to that stage may take away just a little of the joy of ownership.
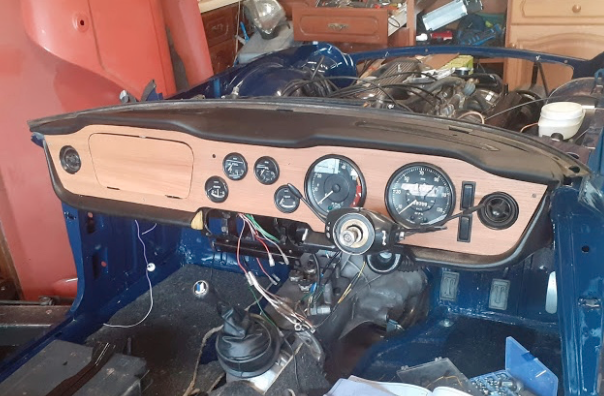
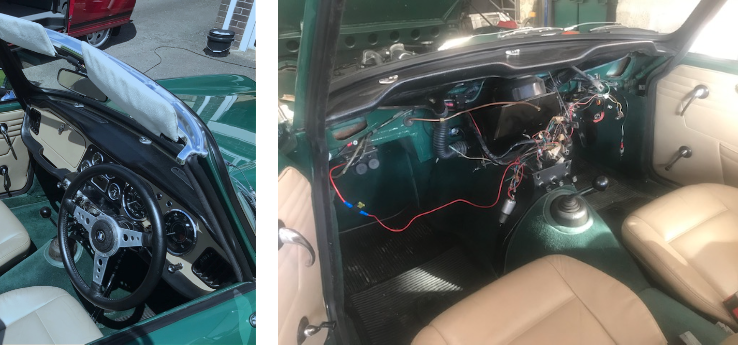
My advice to anyone considering this route as a means to achieve lower cost ownership is; don’t do it! It would have been cheaper and quicker for me to have purchased a complete working car, stripped it down and rebuilt it, knowing all the parts were there and working. If you really want to buy a ‘kit car’ and rebuild it I would advise on also buying a cheap ‘donor car’ for the many smaller bits which will be needed. Do this and sell off everything you don’t need at the end of the project and it will almost definitely be cheaper than buying all the necessary bits new. As of November 2020 the wiring is mostly in place and working, the dash is in position and the gauges are loosely fitted subject to the final, beautiful walnut dash going in. The steering column is in and attached, as are the windscreen brackets, which were a nightmare to fit with the dash in place. The car is now almost ready for the engine to be started, a really big moment, which I am hoping will not throw out any further concerns.
I look forward to being able to post a picture of the finished car out on the roads of Devon in a future edition.
Adam Box
Andrew Willmott – TR4
Dashboard Refurbishment and Allied Tidying
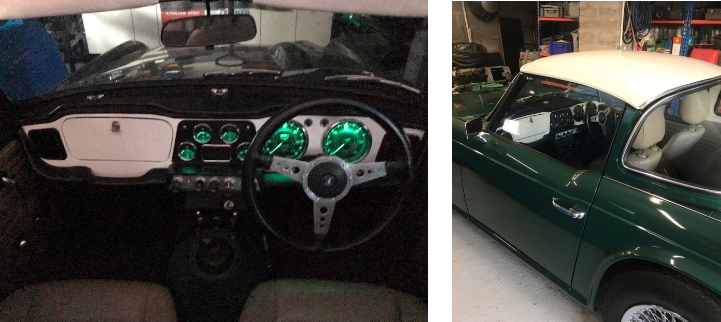
Those of you who know my TR4 will remember that a previous owner had trimmed the dash with a beige vinyl to match the rest of the interior. It looked ok but tended to make the interior look a bit drab when compared with the iconic Spa White dash that the car left the factory with.
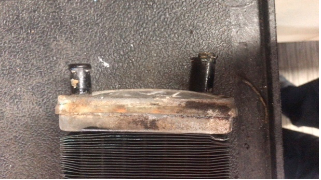
I suspected that the under dash area need a bit of attention so I wasn’t surprised when the strip down revealed a rats nest of wiring, a windscreen washer pump which was floating about above the glove box supported only by its wiring, kinked and leaking plenum drain pipes, an over-pressured and weeping heater matrix, and a heater box supported by only three of its four mountings to match the dash which was secured by only four of the seven bolts which the factory provided.
The heater matrix had clearly been over-pressured.
The metal dashboard was quickly stripped of its non-standard vinyl revealing a surprisingly well-preserved surface with no extra holes or dents and still covered in its original factory white paint. The panel was doused in paint stripper, scraped and the process repeated over a period of a few days until all the white paint and the brown finish on the reverse side had been scoured back to bare shiny metal ready for a trip to the paint shop for the fresh coat of Spa White 2 pack paint to be applied.
While the dash was away a new washer pump was fitted in a more accessible position and the wiring was tidied, modified and secured to minimise rattles. The heater box and fresh air ducts were stripped, vapour blasted and painted black ready for re-assembly and a replacement matrix was fitted thanks to John B who had a spare.
The kinked plenum drains hoses were replaced with convoluted electrical conduit that can follow a tight bend without collapse.
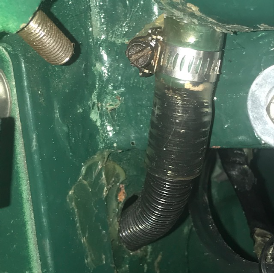
Convoluted plenum drain.
The plenum was cleaned, painted with rust killer and sprayed with cavity wax while I had what was still very limited access and the wiper boss access panels were re-fitted with hand cut rubber gaskets rather than using the previous “gooey stuff”.
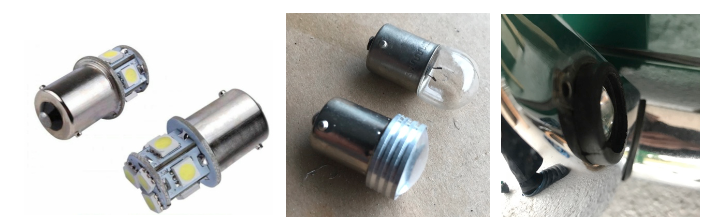
Once the dash was back from the painter re-assembly could begin. It was carefully bolted back in position and the cleaned instruments were re-fitted with gaskets cut from 1mm thick rubber sheet behind them to protect the new paint. The auxiliary controls were fitted and reconnected all the Lucas spade connectors now having been fitted with insulating covers and the instrument and warning lamps having been replaced with LED equivalents.
The steering column was re-fitted and I took the opportunity to replace the flexible rubber couplings with needle bearing knuckles.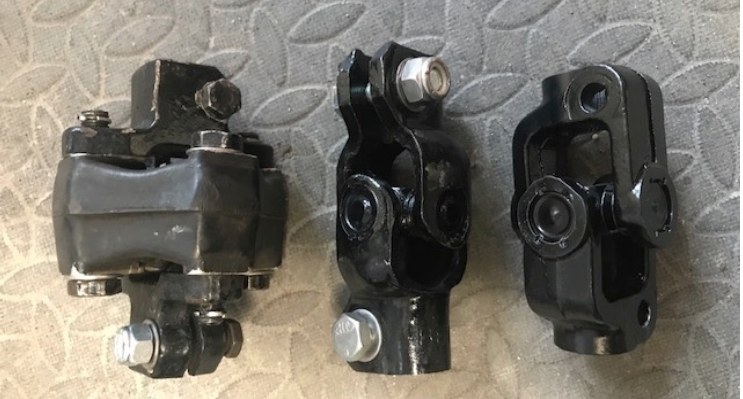
Pictured are three different types of commonly used steering joints. The standard rubber offering that tends to be difficult to secure effectively onto the shaft due to its inherently poor clamp design. A “Group 4” Escort coupling that is a direct replacement, and the slightly shorter forged TR6 lower joint. A forged version of the Escort coupling (similar to the TR6 coupling but the same length as the rubber coupling) is also available and is usually described as Escort, long, heavy duty. I had one of each in my spares stock so that is what ended up being fitted. The steering is now not noticeably different from the original configuration with two rubber joints fitted and there is certainly no sign of any harshness fed back through the steering wheel.
With everything connected the battery isolator was closed and a few minutes was spent peering up under the dash looking for smoke. All was well so the individual components were tested, all functioned as it should.
The label tied that I’d tied to the ignition key reminded me that there was no coolant as it had been drained to remove the heater. The front of the car was jacked up as high as I could get it and the heater valve was fully opened while the radiator was filled. This technique tends to minimise coolant air locks common after draining and re-filling TRs. With the car back on its wheels and the radiator cap removed the engine was started and run up to temperature. The coolant level remained constant indicating that raising the front of the car while filling had prevented air locks.
Dennis Hobbs –TR5
Bench Testing and setting up the Lucas Metering Distributor / Control Unit as Fitted to a Triumph TR5pi
In March 2020 we had our first Covid 19 lockdown. I expect that we all had projects around the home, but what about that Classic car in the garage? I decided that to keep me occupied I needed a challenging project to complete. Some of you will know my background in the motor industry. If not this is a brief summary. Having served a five year indentured apprenticeship as a motor mechanic in the 60s I have spent most of my working life in the motor trade. In 1966, at the age of 21, I immigrated to New Zealand where I bought my first sports car, a frogeye Austin Healy Sprite progressing later to my first Triumph, a TR4A. On my return to England in 1973 I bought a TR5 and have owned her for the past 47 years.
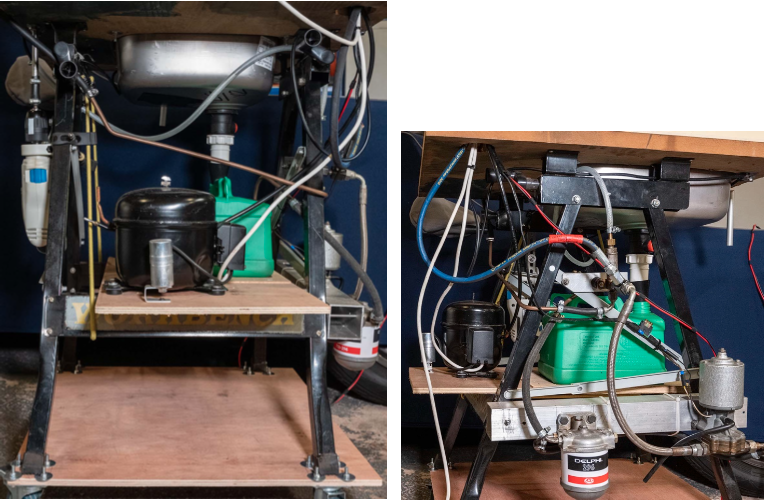
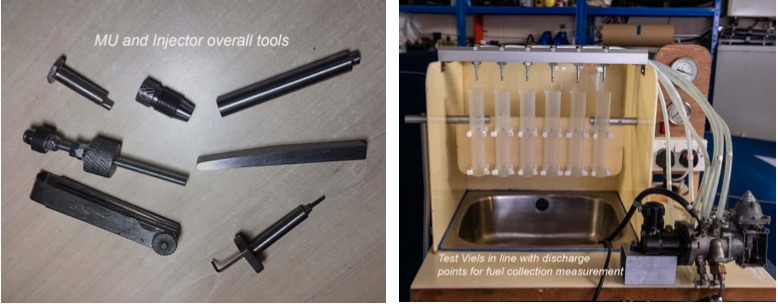
I have been involved in helping many Triumph TR5 & TR6 owners with issues related to the Lucas petrol injection system over the years. It has been an on going ambition to overhaul and set up a metering unit as outlined in the Lucas Training Centre Petrol injection MKII “red book” manual: This is the challenge which I have set for myself. During ownership of TR5 I had collected many parts including two metering units, both from the later 125bhp engines. So my first challenge was to obtain a set of the red 150bhp springs for the vacuum chamber control. To my surprise I found that Revington TR had just advertised them as newly in stock. I turned my attention to a set of the Viton seals plus the fuel diaphragm needed to cope with modern fuels containing ethanol. After obtaining all the parts required, I set my mind to the challenging task of manufacturing a test rig and the tools required to make the basic manual settings of the Metering Unit. I had in my college years while completing my apprenticeship used a calibration test bench to set up diesel inline injection pumps with rack controlled helix metering, so had some understanding of the test and setting procedures needed.
Manufacturing of a test bench to calibrate my overhauled metering unit required a structured approach so I listed the main requirements:
Fuel delivery system with pressure gauge.
Vacuum source with gauge.
Mounting and drive for the MU, which needs to be controlled at 1000 rpm.
This was a very thought challenging time as the cost was a factor and I needed to keep that at a reasonable level. I resolved to use as many of the second hand parts I had to hand together with lots of initiative.
I must also acknowledge the help I had from fellow TR owners for which I am most grateful.
“What have I got to hand which I can utilise?” was a recurring question.
Bench: My old engine table with a hole cut to fit a stainless sink that I already had.
Enclosure: Some commercial sign material cut to size and glued.
Shelves & castors: Plywood, I had to buy new castors.
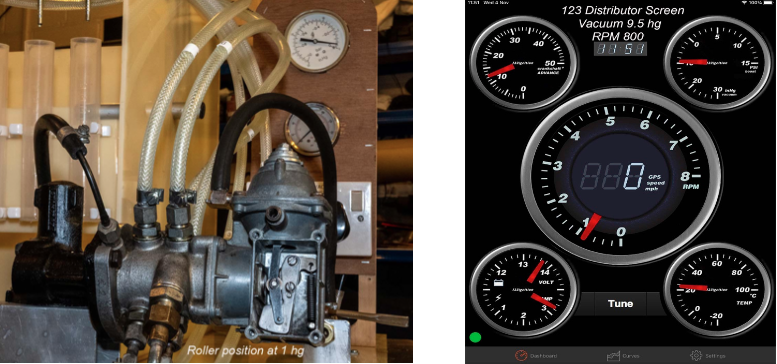
Fuel pressure supply: Second hand Lucas fuel pump and CAV filter with used PRV and pipes.
Vacuum supply: A compressor from an old fridge with water tap from an old TR engine block for control.
Test vials & clips: Bought new with pipes and small other parts needed.
Operating fittings:
Fuel reservoir with other materials to control the calibration process:
Pedestal and drive for MU: A manufactured shaft with gear. Thanks are due for that help.
Special Tools: As shown in the Lucas “red book”. Necessary for setting and assembly,
Thanks are due to all the friends that assisted and helped with the materials needed. As there was no urgency regarding the completion of this project it has been on going over several months.
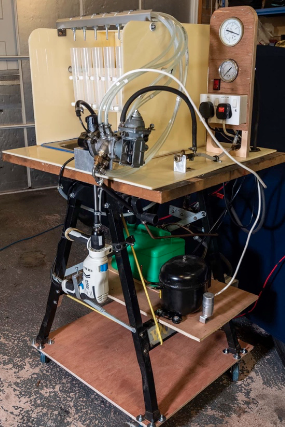
I have included a few photos to show the operating functions of the calibrating test bench, they show how the test vials are moved sideways for collection of fuel delivered at the prescribed rpm and vacuum settings then rotated to empty them into the sink where the fuel drains back into the reservoir.
Also photos showing the different operating functions required calibrating a Lucas Metering Unit.
My intention is to calibrate the MU for my modified TR5 engine that produces 180BHP. It has a lower vacuum reading at the 800rpm tick over then a standard engine. I am able to monitor the vacuum reading using the readout for the 123 distributor on my Bluetooth device. To obtain that reading I have connected the vacuum outlet on the 123 distributor to the manifold for the MU vacuum pipe. I will need to be sure that my test bench vacuum gauge is calibrated correctly to avoid inconsistencies.

If you have any questions regarding the testing and stetting of the Lucas metering unit, please phone or ask next time I see you.
Dennis Hobbs
Paul Gibson – TR6
When Paul rebuilt his newly acquired TR6 starting in November 2014 he decided to protect the underside with Raptor, a super tough product used to protect pickup beds from wear and tear. In use he has found that the coating is quite brittle and once a small chip or crack is introduced moisture penetrates under the coating and rust could set in.
Those who know Paul wont be at all surprised to find that he decided Raptor didn’t meet his high standards and consequently would need to be removed and replaced with a suitable alternative: a considerable undertaking!
That is how we now find Pauls TR6 tub separated from the chassis for the second time in 5 years and lying on its side in his garage while all the outer panels are tucked up safe and warm in his spare bedroom.
The underside is being laboriously taken back to bare metal prior to being treated with Bonda Rust primer followed by smooth Hamerite. The new treatment should provide a good level of protection combined with the advantage of being easily touched up should any corrosion appear in the future.
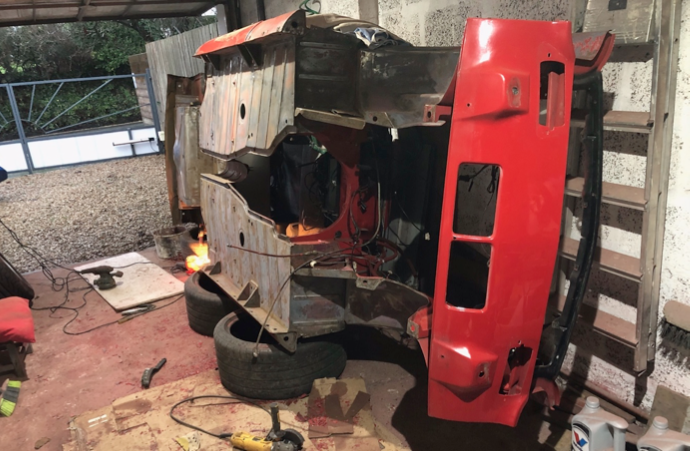
As usual Paul has made great progress and the underside is already resplendent in shiny red.
 It’s certain that Paul will find plenty of other things to fettle while the car is in pieces so look out for subtle detail improvements when you next see the car, although you may have to crawl underneath to appreciate the work.
You – Your Car
Thanks to all our contributors to this issue.
Contributions and feedback (positive or negative) are always welcome.
What’s happening in your garage?
Please make a few notes about your garage exploits and email them to me for the next issue. Contributions are best managed by sending in plain text with attached photos or in Word format.
Mail your notes and pictures to: andrewawillmott@gmail.com Andrew W